Tuesday, May 31, 2016

HOW TO CREATE QUICK SKETCH EFFECT?

MAKE QUICK SKETCHES ....Take one photo and turn it into a drawing!

BEFORE

AFTER


Photoshop has a few tricks up its sleeve to make the task easier. When it comes to making a digital sketch, your new best friends will be the High Pass filter and the Threshold command. While these two are fairly innocuous on their own, when brought together they seek out the outline of a photo and then turn it into a sketch.

  • Find the edges Open up your photo in Photoshop. If your image is lacking contrast, use Levels or Curves to do some boosting. 

  • Now go to the Filter menu, down to Other and pick High Pass.

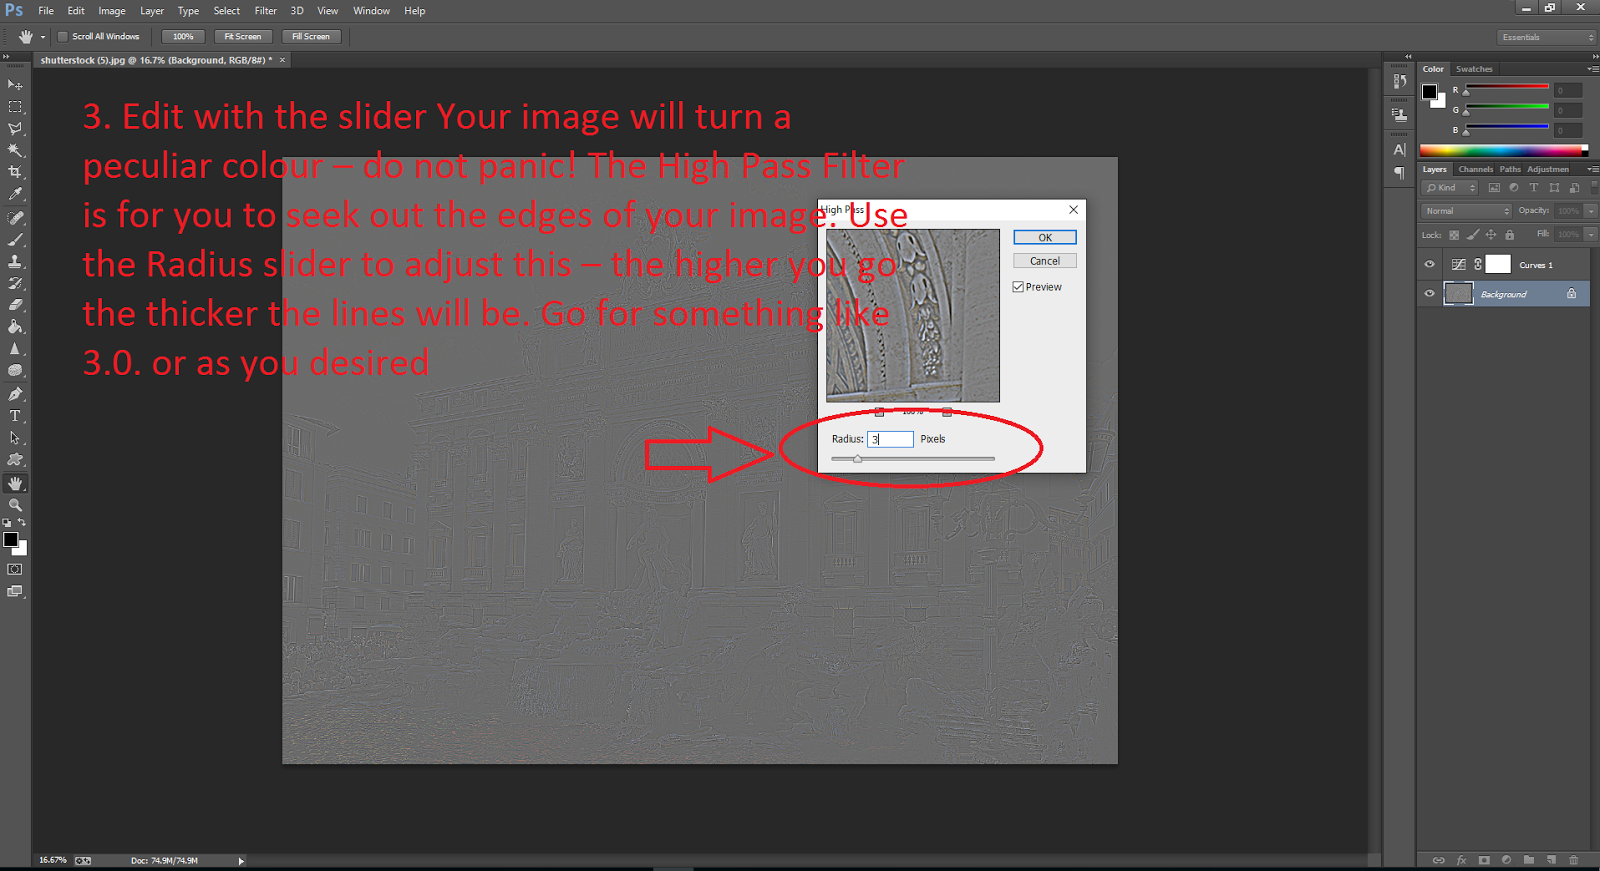
  • Edit with the slider Your image will turn a peculiar colour – do not panic! The High Pass Filter is for you to seek out the edges of your image. Use the Radius slider to adjust this – the higher you go the thicker the lines will be. Go for something like 3.0 or as you desired.


  • Pencil effect Click OK to exit the High Pass Filter. 
  • Next stop is the Image menu and then Adjustments>Threshold. This will turn your image to black and white and once again, there is a slider to edit the effect. 
  • Remember he higher the setting the more intense the e ffect. 

  • Click OK when you are happy.

HOW TO MAKE A MOTION BLUR IN PHOTOSHOP CS6

Motion Blur is great for simulating movement in a subject otherwise frozen on camera. You can either blur the edges of the subject itself or the background.


  • You need to cut out the subject First with the Pen or other selection tools.To Apply a motionblur To blur the background,

  • Inverse the selection with Ctrl/Cmd+Shift+I and 

  • float to a new layer with Ctrl/Cmd+J. 

  • Now select the layer and run Filter>Blur>Motion Blur. 
  • Choose the correct Angle and Distance to suit your image.

Monday, May 30, 2016

HOW TO CREATE AUTHENTIC LENS BLUR USING PHOTOSHOP CS6


To create true-to life lens blurring use Photoshop’s Lens Blur filter with a mask: 


  • Use the Quick Selection tool or any selection tools to select the subject you want to keep in focus.


  • Use Refine edge and adjust the feather as you desire for a smooth edge
  • Go to Filter>Blur>Lens Blur and, in the menu,


  • Set Source to None and tick Invert. 
  • Adjust the Radius and Shape of the blurring depending on the style of lens.

  • Hit OK


Sunday, May 29, 2016

HOW TO CREATE WATERMARK IN YOUR IMAGES


To watermark an image:

  • Select the Type tool (T) and choose a thick font. 

  • Set your Foreground swatch to black. 
  • After typing a name or message onto your image, 

  • Change the type layer’s blend mode to Screen. 
  • Your text will turn invisible, so double-click the layer to open the Layer Styles dialog and 
  • Apply a subtle Bevel and Emboss to reveal the watermark.


Thursday, May 26, 2016

HOW TO IMPROVE REFLECTIONS


To increase the impact of reflection:


Duplicate the Background layer and


Go to Edit>Transform>Flip Vertical.


Reduce the layer’s Opacity as you desired and


Use the Rectangular Marquee tool to mark a selection over an object on the upside-down duplicate. Hit Ctrl/Cmd+J to move this object to its own layer and then hide the duplicated Background layer. 
Position the reflection of the object under its original and rotate if you need to using Ctrl/Cmd+T. 


Use the Eraser tool set to 0% Hardness to remove the surroundings on the reflection's layer.


Wednesday, May 25, 2016

HOW TO SHARPENED IMAGE USING HIGH PASS


There are quite a few different ways to sharpen an image in Photoshop, but High Pass filter is easy & fast . 


  1. Duplicate your Background layer and go to Filter>Other>High Pass. 


  1. Slide the Radius adjustment until you start to see details in the grey areas appear. 
  2. Hit OK and 

  1. Then set the layer’s blend mode to Hard Light. 


  1. You should see the image sharpen up, 
  2. But if it’s too much, lower the Opacity of the layer in small amounts.


Tuesday, May 24, 2016

How to Convert Image into Black & White


1. Prepare and layer


  •  Begin by opening your image in Photoshop.
  • Go to the Layers palette and Ctrl/right-click on the Background layer. 
  • Select Duplicate Layer and 
  • rename it Black and White – this way you won’t make an destructive adjustments to your original photograph.

2. Conversion

  • Go to Image>Adjustments>Black & White. 
  • This will open the Black and White adjustment feature. 
  • Select the custom preset and 
  • begin by adjusting the Red channel. 
  • Use the Preview button and 
  • Slowly drag the slider up to your desire

3. Channel adjustments

  • Move down to the Yellow channel, which will most notably affect the model’s skin tone and the overall brightness of the natural sunlight.
  • Bring the slider up to around 86%, as this will help to contrast the red tones and give a more striking black and white result.

4. Bring out the background

  • Continue to adjust all the channel sliders. Lighten the Green to bring back some detail from the background bushes to around 57%. 
  • Work slowly with the Magenta as there are a lot of di fferent red and magenta tones here, which could create a posterisation effect.
  • Settle the slider at around 75%.


Monday, May 23, 2016

HOW TO APPLY LIPSTICK


  1. Drag the Background layer onto the Create a New Layer button to duplicate 
  2. Lower its Opacity down to 50%. 
  3. Select the Sponge tool
  4. Set it to Saturate in the Options bar. 
  5. Now using a colour of your choice, paint over the lips to apply colour.


Sunday, May 22, 2016

HOW TO LIGHTEN SKIN TONES


To lighten the entire exposure of an image:

  1. duplicate the Background layer 
  2. Apply the Screen blend mode. This will make skin tones look brighter 
  3. And you have control over the Opacity to lessen the effect if needed.


Thursday, May 19, 2016

HOW TO WHITEN TEETH USING DODGE TOOL


To whiten teeth you’ll need:

  1. Grab the Dodge tool set
  2. To Midtones in the Options bar 
  3. With a low Exposure of 25%. 
  4. Make sure the brush is soft and round, 
  5. And then paint over the teeth for a gleaming smile.

This can work for other image elements such as eyes too.


Wednesday, May 18, 2016

How to Protect Skin Tones


The Vibrance adjustment layer improves colour in portraits but protects skin tones at the same time. The adjustment only targets the colours in need of a boost. This is opposed to Saturation, which a ffects the entire image and disregards skin tones.

  • Use the Create a New Adjustment Layer icon in the Layers palette and select Vibrance. 
  • Gently increase the slider and stop just as you see the skin tones starting to look unnatural.


Tuesday, May 17, 2016

How to Modify Edges in Photoshop Cs6


Once a selection has been made:

  1. Adjust the properties of that area. Under the Select menu, there’s a fly-out list of Modify options. These include;
    • Feather, which softens the edge of the selection instead of a hard outline, 
    • Smooth will remove pointy edges and 
    • Contrast and Shift edge enlarge the size of the area. 
    • All these options can be combined with one selection for the perfect cutout. Press Q to preview what the selection edge looks like.

Change Eye Color


To change the colour of eyes


  1. use the Brush tool and change its mode to Hue in the Options bar. 
  2. Lower its Opacity down to 50% and 
  3. click on the Foreground colour swatch to choose a new hue for the eyes. 
  4. Paint over with a Soft Round brush to prevent hard edges and, because it’s set to Hue, the pupils are un affected.

Sunday, May 8, 2016

Image Composition using color match, gradient and layer mask tool


Source Image 1


 Source Image 2


Gusto nating mangyari

Sa pag aaral na ito ay susubukan nating gumawa ng isang image na galing sa dalawang source na image. Gamit ang basic tools na layer mask, gradient at ang color match na tool na makikita sa may image menu bar sa adjustment option, para magiging madali at maganda ang kalalabasan ng ating image composition.


Ang composition na ito ay gusto lang natin na ilagay ang mga bato bato sa bahay or yung bahay sa isang image na bato bato. Marami pa ang mga paraan para gawin ito subalit sa paraan na ito ay madali at hindi na kailangan pa ng marami pang trabaho. Sa pamamagitan lamang ng tatlong tools na ito ay mabubuo na natin ang ating composition.

Simulan na natin…

1. Una ay I handa natin ang ating dalawang images na gagamitin sa ating composition. At I select mo ang image na gusto mong I merge at pagkatapos dalhin mo doon sa isa pang image source natin.


2. Ipantay natin ang laki nito sa isang image natin gamit ang transform tool (Ctrl + T) sa ating mga keyboard para mai adjust natin ang laki ng isang image natin. At kapag napantay na nating ito ay aayusin natin ang mga layers base doon sa ating gustong mangyari Pwede natin I explore ang dalawang image kung alin ang mas maganda ang kuha kapag sinumulan na natin ang ating composition. At pagkatapos ay lagyan mo na ng layer mask itaas na bahagi ng layer panel natin.


3. Pagkatapos na malagyan na ng layer mask ay pindutin ang Gradient tool natin at tingnan sa taas ng option bar natin kung linear gradient ang naka highlight. at pagkatapos na ma check at ayos na lahat ay simulan na ang

Pag merge ng dalawang image sa pamamagitan nito:


Pwede na I explore at subukan kung ano ang pwede mangyari kung magsisimula ka galing sa taas ang pindot hanggang pababa o sa gilid hanggang sa makuha mo ang gusto mong mangyari sa image mo.

1. At kung halimbawa magkaiba ang kulay ng dalawang image mo ay dyan na papasok ang color matching. Para hindi halata na ginawa mo lang sa photoshop ang image mo or makakuha ka ng magandang composition.


Ang mga papalitan mo ay yung mga nakabilog una, ay mamili ka ng source para sa gusto mong output na mangyari. Pangalawa ay kung alin na image ang gusto mon a magbago, .ay mga option yan ang mamimili ka lang at explore mon a rin kung ano ang pwede na mangyari sa mga napili mo. Pangatlo ay timplahin mon a ngayon ang image kung maganda na bas a pangingin mo.

Laging tatandaan sa pagpili ng mga images na gusto mong I merge ay halimbawa ang mga shadows kung may araw kung parehas ba para hindi halata. Isa alang alang lagi ang mga gagamitin na mga source mo kung bagay ba o hindi.


Salamat at hanggang sa muling pag aaral… God bless us all!!!