Tuesday, July 12, 2016

Quick Depth of Field using Iris Blur in Photoshop


One of the thing that separate professional portrait from the snap shot is selective focus or shallow depth of field, but the problem is if you’re using a mobile device like the iPhone while its very convenient it’s almost impossible to get that look and if you are using a high and point of shoot unless it has a high and precise lens it’s a very difficult to get that look. Even with the DSLR with the fast lens you need to have that set just right to get that shallow depth of field.

So I want to show you a quick and easy way to take any image from any device in giving a nice blurred background in Photoshop.

Steps:

1. Go to Filter menu Bar and come down to Blur and go over to Irish Blur.
2. And put the center of the pin wherever we want the image to be in focus
3. Adjust the slider in the pin, just select where the effects begins and ends
4. Adjust the inter pins.. it shows where the effects starts and the outer oval is where the effect in its full strength and the area in between showing the feathering effects.
5. We can move the inter pins together or independently using ALT key in your keyboard. 
6. And we can even do that is photographically impossible by clicking in the desired area that you want to focus and create another depth of field.
7. Click OK if you are already satisfied. 


Tuesday, June 21, 2016

HOW TO CREATE LENS FLARE IN PHOTOSHOP


Macro images are just begging for a creative lens effect, and there’s none better than a trusty lens blur. 
  • Firstly, create a new layer and fill it with black. 

  • Change this layer’s blend mode to Screen and 

  • Then go to Filter>Render>Lens Flare.

  • Pick the 50-300mm Zoom option and set Brightness to 145%.

  • Hit OK and position the flare over the main subject.


Monday, June 20, 2016

HOW TO REMOVE RED-EYE in PHOTOSHOP


  • Select the dedicated Red Eye tool and 


  • Set its Pupil Size and Darken value (it may take a few attempts to get these just right), 
  • and then simply mark a rectangle over the whole eye.


Wednesday, June 15, 2016

QUICK WAY TO CREATE FOLDED CORNER EFFECT


A very quick way to fold a corner is by using the Warp Transform tool.
  • You’ll need to unlock your Background layer by double-clicking on it, 


  • and then go to Edit>Transform>Warp or Ctrl + T then right click and select warp. 

  • Drag one of the transform points on a corner inwards to the center. 

  • Hit Enter to apply, and you can drag in an image below its layer for extra style.


Thursday, June 9, 2016

HOW TO CHANGE THE COLOR OF HAIR


Before


After


  • Create a blank layer and 

  • Set its blend mode to Color. 

  • Lower this new layer’s Opacity to 25%.
  • Set the Brush tool to 50% Hardness and a color of your choice,
  • and then paint over the hair. 

  • The new e ffect should blend with the hair’s texture.


Thursday, June 2, 2016

HOW TO EDIT/CUSTOMIZE TEXT IN PHOTOSHOP


How to utilize text formatting in Photoshop?


For practice purposes;

  • Create a new document and select preset or customize your document as you desired.
    • File menu bar > New


  • Now place your text.
    • Click Horizontal type tool or T in your keyboard. and select the font style you want to use.


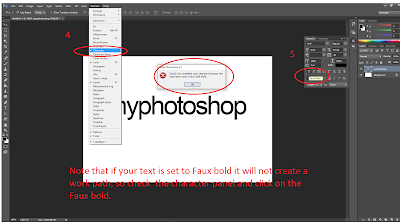
  • Right Click on text layer and click on the create work path
    • Note that if your text is set to Faux bold it will not create a work path, so check  the character panel and click on the Faux bold. 


  • After clicking the work path, turn off the text layer. 

  • Now you can edit your text thru Path and Direct selection tool.
    • Path selection is to select or move the text or letter
    • Direct selection is to edit the specific text


Tuesday, May 31, 2016

HOW TO CREATE QUICK SKETCH EFFECT?

MAKE QUICK SKETCHES ....Take one photo and turn it into a drawing!

BEFORE

AFTER


Photoshop has a few tricks up its sleeve to make the task easier. When it comes to making a digital sketch, your new best friends will be the High Pass filter and the Threshold command. While these two are fairly innocuous on their own, when brought together they seek out the outline of a photo and then turn it into a sketch.

  • Find the edges Open up your photo in Photoshop. If your image is lacking contrast, use Levels or Curves to do some boosting. 

  • Now go to the Filter menu, down to Other and pick High Pass.

  • Edit with the slider Your image will turn a peculiar colour – do not panic! The High Pass Filter is for you to seek out the edges of your image. Use the Radius slider to adjust this – the higher you go the thicker the lines will be. Go for something like 3.0 or as you desired.


  • Pencil effect Click OK to exit the High Pass Filter. 
  • Next stop is the Image menu and then Adjustments>Threshold. This will turn your image to black and white and once again, there is a slider to edit the effect. 
  • Remember he higher the setting the more intense the e ffect. 

  • Click OK when you are happy.

HOW TO MAKE A MOTION BLUR IN PHOTOSHOP CS6

Motion Blur is great for simulating movement in a subject otherwise frozen on camera. You can either blur the edges of the subject itself or the background.


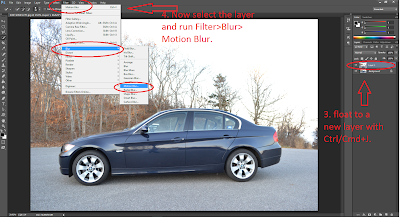
  • You need to cut out the subject First with the Pen or other selection tools.To Apply a motionblur To blur the background,

  • Inverse the selection with Ctrl/Cmd+Shift+I and 

  • float to a new layer with Ctrl/Cmd+J. 

  • Now select the layer and run Filter>Blur>Motion Blur. 
  • Choose the correct Angle and Distance to suit your image.

Monday, May 30, 2016

HOW TO CREATE AUTHENTIC LENS BLUR USING PHOTOSHOP CS6


To create true-to life lens blurring use Photoshop’s Lens Blur filter with a mask: 


  • Use the Quick Selection tool or any selection tools to select the subject you want to keep in focus.


  • Use Refine edge and adjust the feather as you desire for a smooth edge
  • Go to Filter>Blur>Lens Blur and, in the menu,


  • Set Source to None and tick Invert. 
  • Adjust the Radius and Shape of the blurring depending on the style of lens.

  • Hit OK


Sunday, May 29, 2016

HOW TO CREATE WATERMARK IN YOUR IMAGES


To watermark an image:

  • Select the Type tool (T) and choose a thick font. 

  • Set your Foreground swatch to black. 
  • After typing a name or message onto your image, 

  • Change the type layer’s blend mode to Screen. 
  • Your text will turn invisible, so double-click the layer to open the Layer Styles dialog and 
  • Apply a subtle Bevel and Emboss to reveal the watermark.